Installing Windows
Installing your own windows in a house or cabin is something that is very doable for a do-it-yourself minded person. Windows can be ordered to pretty much any size and quality that you desire. For our cabin, we went with vinyl, Low-E windows with argon gas. We went with AMSCO windows because they were a good bang for the buck. I know there are many others in that category. The steps below will guide you through installing your own windows.
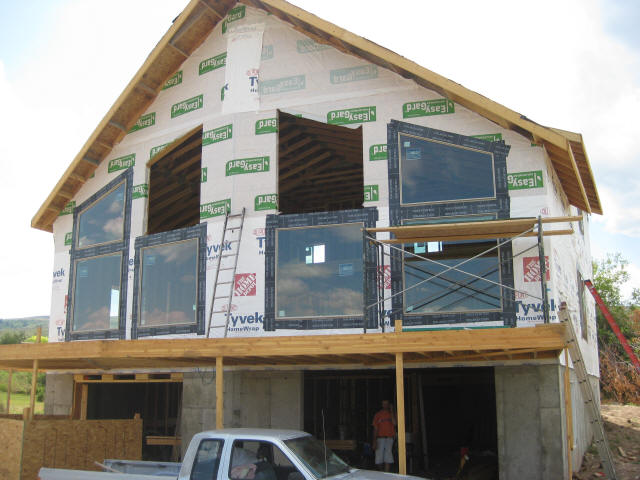
Shown above are the large windows we installed in the front of the cabin. These windows ended up with pretty thick glass due to there size and were 200-300lbs each. You definitely need a couple extra hands when installing windows of this size.
Measuring for New Window Installation
Before ordering or getting bids on your windows you must measure up all the window openings. Follow the steps below:
1. Measure the window opening width from one side to the other. Measure three times, at the bottom, middle, and top of the window in case the window jamb is not even. If there are discrepancies between the measurements use the narrowest of the three.
2. Measure the window opening height from top to bottom. Measure three times, at the left, middle, and right side of the window in case the window jamb is not even. If there are discrepancies between the measurements use the shortest of the three.
3. Many window suppliers will automatically subtract 1/2 inch from the dimensions you provide for the window opening. This will provide 1/4" of gap all the way around the window. If you are replacing existing custom sized windows and happen to measure the exact size for the old window instead of the openings, make sure your supplier knows exactly what you measured so you don't end up with the wrong sizes.
There are some standard window dimensions such as 4040 or 5040. This stands for 4' wide by 4' tall and 5' wide by 4' tall respectively. Window measurements are always listed width x height. Here is a table of windows by one manufacturer along with actual dimensions for each. You should add 1/2 inch to the actual width and height for rough opening dimensions if you were to order from a table like this. In other words, for a 4040 window, make your rough opening during framing 4 ft by 4 ft.
| Nominal Size | Actual Window Dimension |
| 2030 | 23.5 x 35.5 |
| 2040 | 23.5 x 47.5 |
| 2044 | 23.5 x 51.5 |
| 2050 | 23.5 x 59.5 |
| 2060 | 23.5 x 71.5 |
| 2430 | 27.5 x 35.5 |
| 2440 | 27.5 x 47.5 |
| 2444 | 27.5 x 51.5 |
| 2450 | 27.5 x 59.5 |
| 2460 | 27.5 x 71.5 |
| 2830 | 31.5 x 35.5 |
| 2840 | 31.5 x 47.5 |
| 2844 | 31.5 x 51.5 |
| 2850 | 31.5 x 59.5 |
| 2860 | 31.5 x 71.5 |
| 3030 | 35.5 x 35.5 |
| 3040 | 35.5 x 47.5 |
| 3044 | 35.5 x 51.5 |
| 3050 | 35.5 x 59.5 |
| 3060 | 35.5 x 71.5 |
| 3830 | 43.5 x 35.5 |
| 3840 | 43.5 x 47.5 |
| 3844 | 43.5 x 51.5 |
| 3850 | 43.5 x 59.5 |
| 3860 | 43.5 x 71.5 |
| 4030 | 47.5 x 35.5 |
| 4040 | 47.5 x 47.5 |
| 4044 | 47.5 x 51.5 |
| 4050 | 47.5 x 59.5 |
| 4060 | 47.5 x 71.5 |
Installing New Windows
Installing windows is pretty straight forward. Pick up some 9" Ice and Water shield, or equivalent peel & stick flashing that comes in a roll and is made for windows. House wrap on the sheeting of the exterior wall of the house should be cut and tucked into the window frame on the sides and the bottom sill before starting. Leave the house wrap at the top of the window loose as you will want to bring it over the top of the window frame. Follow these steps for installing the flashing:
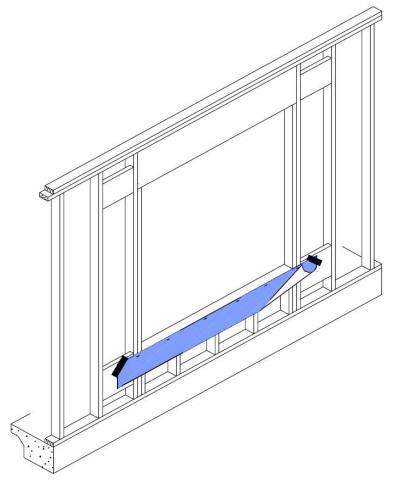
As shown above, run one strip of flashing along the bottom of the window opening.
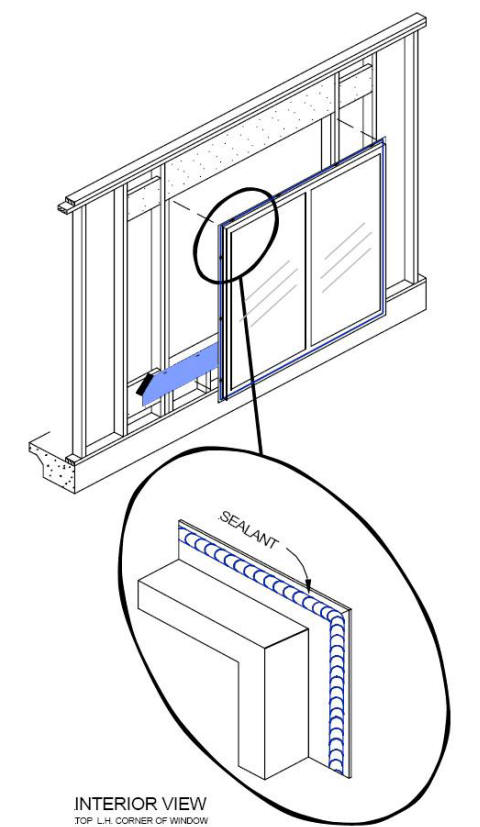
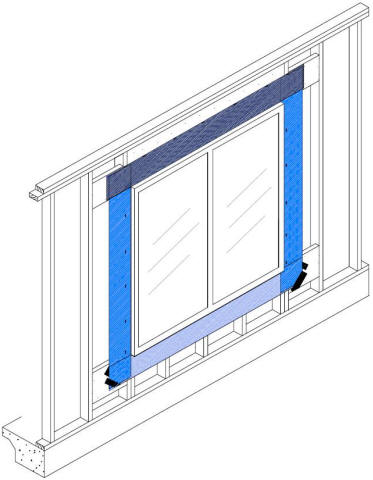
Now put some sealant around the perimeter of the window and put the window into place. Be sure the window frame is installed under the house wrap on the top. Once you set the window in place, go inside to shim the window. Make sure if it's a sliding window that it opens and closes smoothly and also as you close the window it closes evenly from top to bottom. In other words if the sliding window is open 1/2" it is open a 1/2" on the bottom as well as at the top. Once you are happy with the shimming, you are ready to screw or staple the window in place. We used 2" staples because it was a lot faster but screws will work as well.
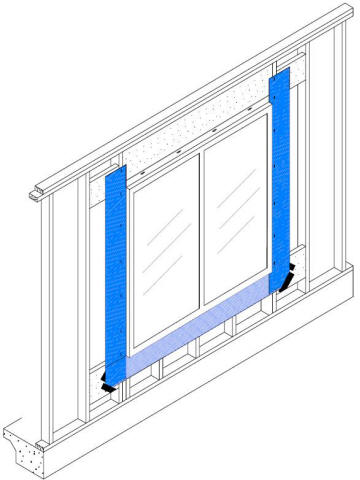
The next step (shown above), is to run flashing down the sides of the window.
Put a bead of sealant along the top of the window frame. Now the window is ready to overlap the house wrap and final flashing.
The final strip of flashing is installed along the top of the window and will finish things off.
Selecting What Type of Window to Buy
Low-E (emissivity) windows offer much better insulation from heat and cold than standard glass. Low-E windows have a thin layer of hard or soft metal coating. This metal coatings reflects heat on the inside as well as outside of the window. This helps you in both winter and summer. In the summer it reflects the suns rays away from the outside of the house keeping the inside cooler. In the winter, it reflects radiant heat waves back inside from something like a furnace rather than letting them radiate out through the window. All around Low-E windows are the way to go these days when installing windows and have become standard in new homes. Whether or not you pay the premium for argon gas is up for debate. Some argue they don't hold there gas very well over time, others say they are fine. You'll want to do a quick cost/benefit analysis once you get some quotes to see if its worth it. For our cabin, the additional cost was minimal so we went with the argon filled Low-E windows.
| Type of Glass | R Value |
| Single Pane regular glass | 0.85 |
| Clear Insulated Glass 7/8 inch overall thickness | 2.08 |
| Hard Coat Low-E insulated glass | 2.45 |
| Hard Coat Low-E insulated glass with argon | 2.75 |
| Soft Coat Low-E insulated glass | 3.5 |
| Soft Coat Low-E insulated glass with argon | 4.35 |
Back to top - Installing Windows