DIY Geothermal
Many people ask themselves, why are geothermal systems so expensive? Well they don't have to be. This DIY Geothermal website will show you how to do-it-yourself and have a geothermal system that works as well as anything the professionals would build for you at a fraction of the cost. All you need are some basic plumbing skills and the help of a backhoe and you can make it happen.
Background on Geothermal
Geothermal heating and cooling has become more and more popular in the U.S. due to its high efficiency and recent government tax credits. Even in areas without high temperature geothermal resources, a geothermal heatpump can still provide heating and air conditioning in a home. Similar to a refrigerator or air conditioner, these systems use a heat pump to force or transfer heat from the ground to your home. A ground-source heat pump uses shallow ground (typically a consistent 50-55F) as a source of heat. In colder climates, this is much more effective than an air-source heat pump since drawing heat from bitter cold air requires more energy.
Closed loop geothermal heat pumps circulate a water/antifreeze mix through pipes buried in the ground. As the fluid circulates in the ground it absorbs heat from the ground bringing its temp up to let's say 45F. This fluid returns to the heatpump in the house where heat is extracted from the fluid. The rechilled fluid (approx 20-25F) is sent back through the ground loop continuing the cycle. The heat that is extracted from the fluid is used in to warm the house. Using the ground heating loop in the energy equation means that more heat is generated than if electricity alone had been used directly for heating. In fact, depending on the efficiency of the heatpump (seen as a COP rating) you can generated 3.5 to 5 times the heat per kilowatt of electricity than a pure electric heater. Switching the direction of the refrigeration cycle in the heatpump and the exact same system can be used for very efficient air conditioning in the summer months. The heat is exhausted into the same relatively cool soil rather than delivering it to the hot outside air like typical air conditioners do. The greater temperature difference leads to higher efficiency and lower energy use.
Animated demo of geothermal system Animated Demo
Short video explaining geothermal systems (~3min) Geo Video
Geothermal heating and cooling has attracted a lot of attention from the Green community recently. According to the U.S. EPA, geo-exchange systems save homeowners 30-70% in heatings costs and 20-50% in cooling costs compared to conventional systems. That's why a DIY geothermal system is so attractive! These systems are built to last for decades and can add considerably to the resale value of a home.
Geothermal Heating Fuel Comparison
The potential savings in fuel costs can be seen by using the following spreadsheet. This calculator allows you to adjust for local utility rates as well as the COP rating for your heatpump to see how geothermal stacks up against other fuel options. For the cabin we installed our DIY geothermal system in, we really had three choices - propane, electric element heater, or geothermal heatpump. Geothermal was clearly going to be the most efficient...so with a little research we designed this system ourselves and went to work.
Heating Fuel Calc 2009 (xls) - 51kb
DIY Geothermal Installation (closed loop system)
1. Burying the Geothermal Pipe
For a closed loop system, 3/4" HDPE pipe is often buried in a trench. It is also possible to drill a series of deep shafts similar to drilling a well and then insert pipes vertically into the holes rather than using trenches. In our case having trenches dug was more cost effective. This is actually where professional geothermal installers can rack up a serious bill and where DIY geothermal saves so much money. Drilling vertical shafts for geothermal pipe is similar to drilling a 150' well. It's not cheap..and then multiply the cost by 5 or 6 as you typically need that many holes to bury all your pipe. To support the 5-ton heatpump for our cabin we used six 600' coils of pipe for a total of 3600 ft. I searched locally for this pipe and ended up buying the pipe online from a retailer called Geo-hydro supply (www.geohydrosupply.com). The price was $143 per 600ft coil of 3/4" pipe. Below are some pictures of us burying the pipe.
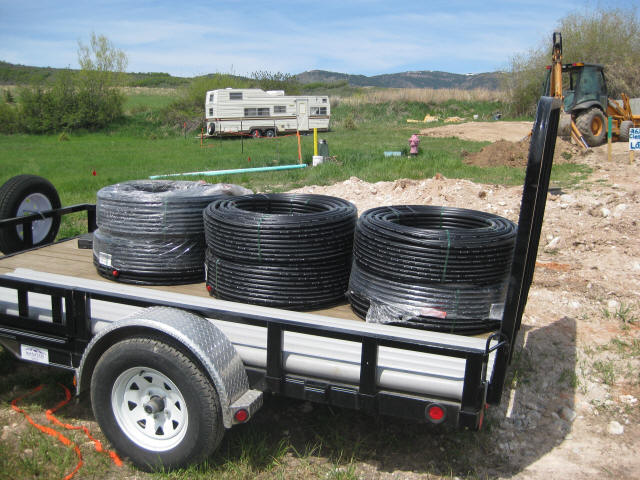
Spools of 3/4" HDPE pipe for DIY geothermal.
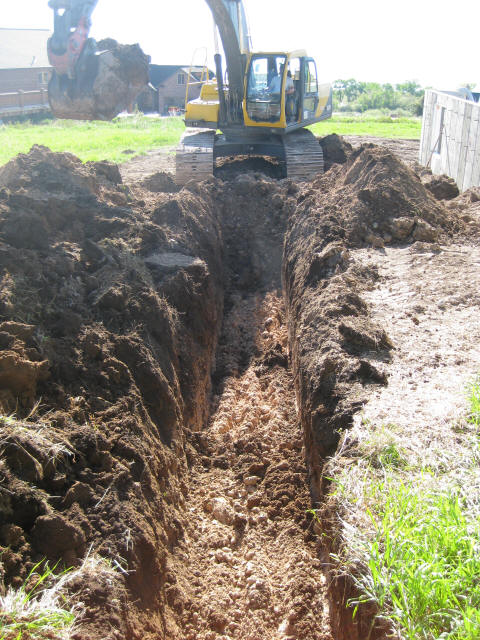
It helps to have a big track-hoe dig the trenches. This one we hired out had a bucket that was over 3ft wide and went very fast. Lutz construction in Garden City did the work and it took them about a half day to dig and backfill all the trenches we needed. We had them dig until they hit hardpan which was about 5 ft down in most parts of the yard. Each trench was 125-150 ft in length to handle the 600' of pipe. This step is where DIY geothermal is probably not 100% do-it-yourself. You'll probably either need to rent a trackhoe or just pay someone to dig for you. I think we paid around $1000 to have all of our trenches dug and backfilled.
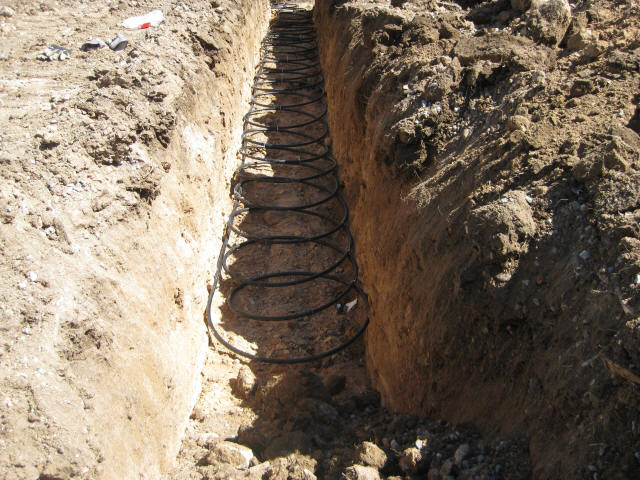
Once the first trench was dug, we started uncoiling the pipe starting at the far end of the trench and working back towards the cabin. We used zip ties to hold the uncoiled pipe in place as we went. We were able to install the entire trench of pipe in about the same time it took them to dig the next trench so we moved to the second trench and had them backfill this one.
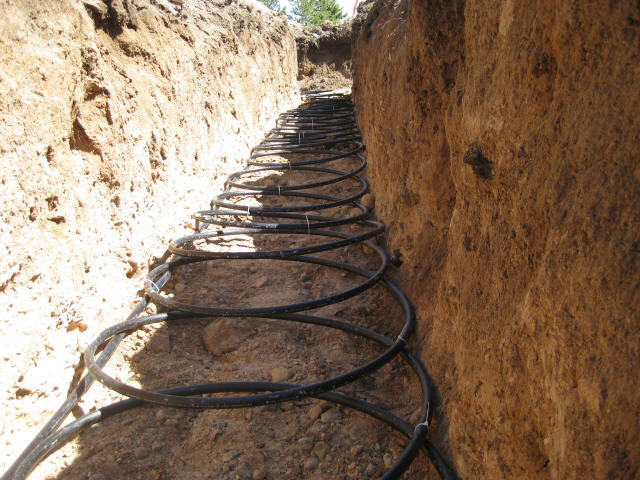

There was a large irrigation cannel on the upper side of our yard. When we trenched close to it our trench started to fill with water as you can see in this picture. Even though it was a mess to work in, it provides good thermal transfer during the summer.
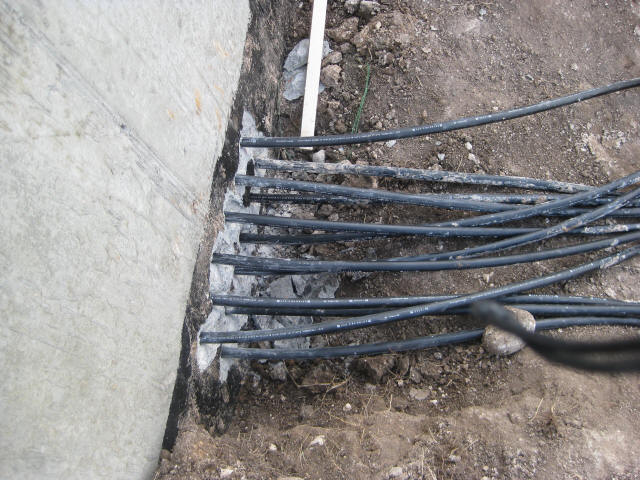
Another area that DIY geothermal folks get hung up on is how do I create a manifold for the goethermal HDPE pipe? In professional installs, HDPE is typically fused to an underground manifold. It requires special tools and also doesn't allow you flexibility in controlling flow to each of your loops. Our solution was to have both ends of the pipe loops were run through the foundation into the basement to avoid having to do any fusion splices or other fittings outside that might leak. You can see here for 6 loops we had 12 holes through the foundation. We rented a large hammer drill with a 1 1/8" bit. Make sure to hammer drill from the inside since the concrete naturally breaks out a bit as it exits. Also, this will insure the holes are right were you need them in the inside to mate to you manifold.
2. DIY Geothermal Manifold
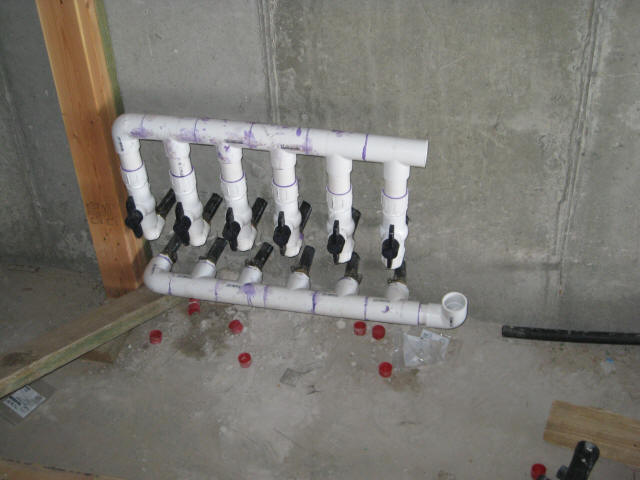
A DIY geothermal manifold can be made out of 1 1/4" PVC fittings. There are individual control valves on each supply line to allow us to balance coolant flow.
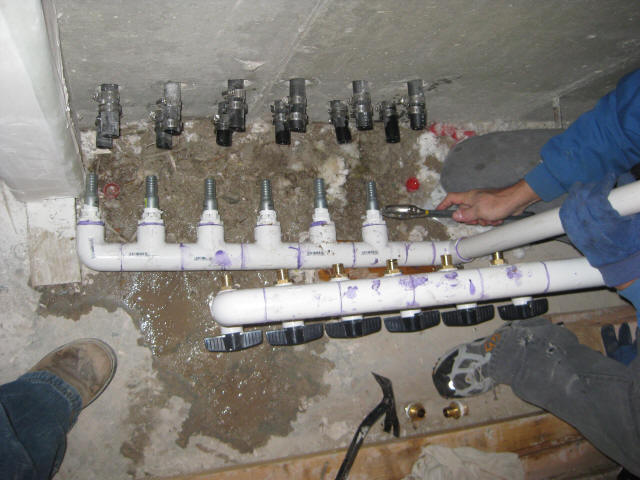
Here was a lesson learned about fittings. Originally we tried 1"x1" PEX fittings because they seemed to fit just right but they would not seal up once we started circulating the fluid. We ended up changing to some galvanized steel fittings with longer barbs. Using these in conjunction with double hose clamps on each line solved the leaks.
3. DIY Geothermal Circulating system
We choose the QT Flow Center with two pumps to circulate the fluid in our DIY geothermal system. We purchased this from geo-hydro supply as well which cost us $699. Below is a picture of the QT Flow Center. I've also provided links here for the manufacture's brochure and QT flow center installation guide. I could not find the installation guide anywhere else online so I've scanned it in. It's actually quite useful.
QT Flow Center brochure (pdf) - 1801kb
QT Flow Center Installation Guide (pdf) - 357kb
4. DIY Geothermal Heatpump
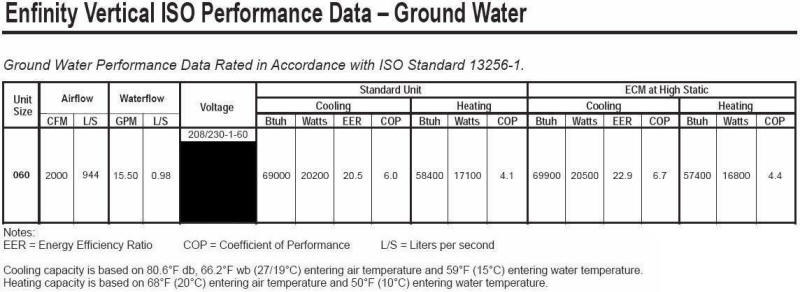
We decided to go with a 5-ton McQuay heatpump for our DIY geothermal system. We purchased online for $4566 shipped. The model # was VFW1060 with the ECM blower, desuperheater option, and a 20KW auxiliary heat strip. You can get higher end heatpumps from Bryant or Carrier that include 2-stage operation but quotes we received for those were around $7500 just for the heatpump. ClimateMaster is a popular, if not the most popular, 2-stage geothermal unit for do-it-yourselfers. If I was putting one of these systems in my primary home I would pay extra for the 2-stage efficiency but since this was a cabin we'd use mostly on weekends the McQuay was perfect. Below is a picture and performance data for the McQuay unit.
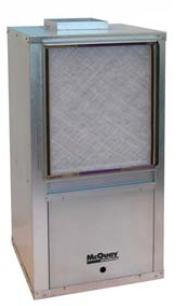
McQuay Heatpump Summary (pdf) - 87kb
McQuay Complete Catalog (pdf) - 2147kb
5. DIY Geothermal Plumbing
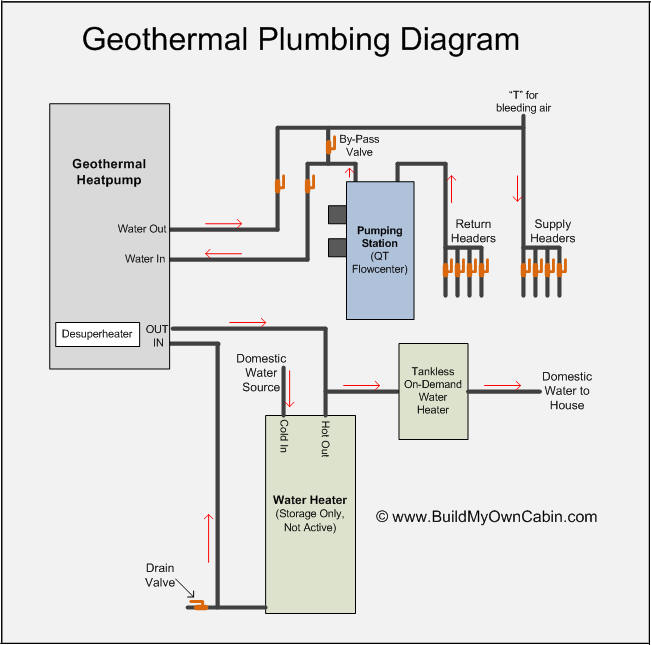
DIY Geothermal Plumbing Diagram (PDF, 57kb)
The diagram above illustrates the basic plumbing for our DIY geothermal system, including the domestic hot water setup.
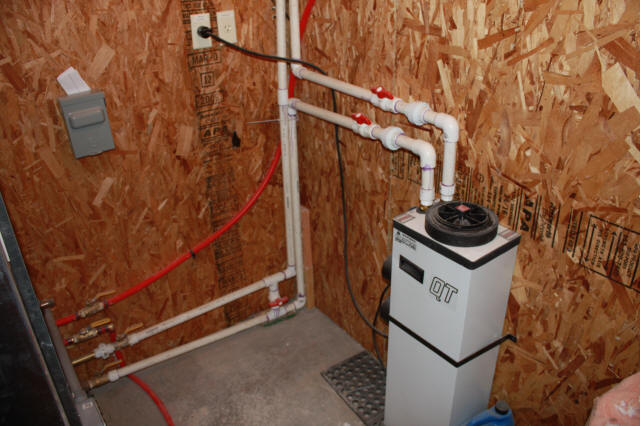
Shown above is the QT flowcenter pumping station that we used. We mixed 10 gallons of antifreeze (Ethylene Glycol) with water to fill the system. Based on an inside diameter of 0.86 inches for the 3600 ft of HDPE tubing, the total capacity of our system was just over 100 gallons. This gave us a 10% mixture of antifreeze to water with a freezing point of approximately 23 degrees F. During normal operating conditions your system should never get close to these temps.

We picked up a cheap electric hot water heater to serve as a reservoir for our domestic hot water (DHW) generated by the desuperheater in our geothermal heatpump. The water heater is not connected to power although it could to serve as a backup for your hot water system. The warm water from this tank is then fed to the inputs of the on-demand water heaters where the water is brought up to full temp and fed throughout the cabin. The desuperheater option really does put out a ton of heat, the PEX tube coming from the heatpump to the water tank is quickly hot to the touch after running the heatpump for a little while. Often times, the on-demand water heaters are only required to boost the water temp by 10-20 degrees which makes your hot water heating very efficient.
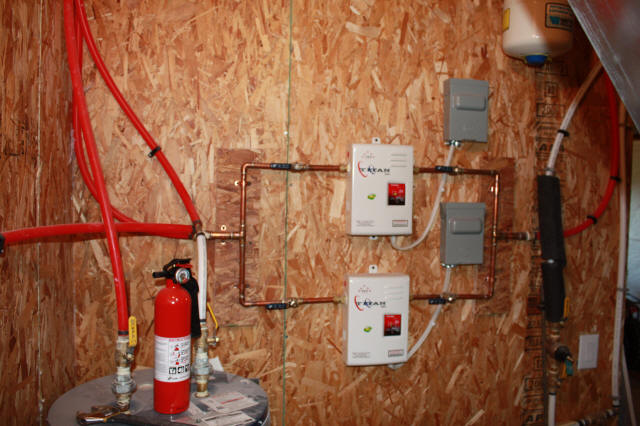
Picture of electric on-demand water heaters tied into the preheated water storage tank.
6. Ductwork
We hired out the ductwork for our cabin which ended up being a huge mess. They changed the price they originally quoted us and charged us over $3K in the end. On top of that they were unwilling to seal up the seams of the ductwork which we ended up having to do ourselves. Also, we found they improperly sized the ducts for a 5-ton heatpump after later researching it. This ended up causing a problem with the ECM blower where it would continually hunt for the correct speed. This ended up creating an annoying surging sound whenever the blower was running. We ended up getting this resolved by locking the fan speed to a lower setting. The whole reason we went with a HVAC contractor on this part was because we were unsure on how to properly size all the ducting but as it turned out I'm sure we could have done a better job ourselves. This portion of the project reaffirmed why I like doing projects myself rather than hiring stuff out.
7. Geothermal Tax Credits
There are many tax benefits to installing a geothermal heating and
cooling system and these benefits apply to DIY geothermal projects
as well. The feds offer a one-time tax credit of 30% of
the total investment for all residential ground loop or ground water
geothermal heat pump installations. There is no maximum limit cap
on installation costs.
Energy Star requirements must be met or exceeded to qualify for this tax
credit. To file for the credit owners should complete the Renewable
Energy Credits subsection on their tax return forms or speak to a
professional tax associate. No proof of purchase is required;
however, owners are encouraged to keep records of the purchase and
installation. The tax credit is available through December 31,
2016.
This tax credit really helps offset the cost of your DIY geothermal system and was one of the primary reasons we decided to give it a try. Our entire geothermal system cost $11k including pipe, trenching, heatpump, ductwork, circulators, etc. After the tax credits we were out about $7500. Not bad and now the real saving have begun. We've had our system in for a couple years now and heating and cooling bills for the entire cabin are less than $100/mo. I know cabins in the same area spending $100/week or more on their propane heat. This DIY geothermal system will pay for itself in just a couple years.
Back to top - DIY Geothermal Heating/Cooling
Geothermal - Frequently Asked Questions
Geothermal - Heat Pump Glossary