Central Vac Installation - Existing Home
In a Partition Wall
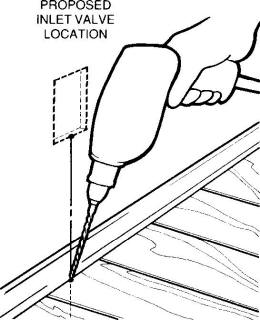
Central vac installation in existing homes takes some additional planning and work but it can usually be done. You can use basic low voltage valve backing plates or electric valves (which has romex and backing plate). Determine the desired location of the inlet valve and locate the point directly below the center of the proposed location. Holding the drill vertical and as close to the wall as possible drill a small pilot hole through the floor and sub floor. The straight section of a wire coat hanger cut at an angle makes a good pilot hole drill bit. (Be careful not to snag carpeting.)
Locate this pilot hole from beneath and measure over approximately 2 1/4 (1/2 for drywall + 1 3/4” to center of the sole plate, that is the base of the wall) adding extra for the thickness of any baseboards. Using a 2 1/2’ hole cutter, drill upwards through the flooring and the sole plate. Using a flashlight inspect the interior of the wall to make sure there are no obstructions. Alternatively a piece of tubing can be used to probe for obstructions.
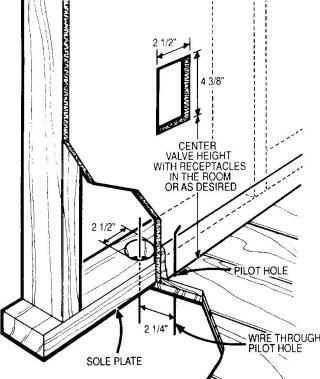
Having determined the location is suitable cut a 2 1/2’ X 4 3/8” hole in the wall at the desired inlet valve location. Remove the side portion of the mounting plate by cutting off the plastic with side cutters. Tape low voltage wire to the end of a sufficiently long piece of tubing and pass it up from beneath. If the trunk line is in the attic, tie a weight to the end of the low voltage wire and lower it through the opening. Remove the wire and pass it through the upper hole in the trimmed mounting plate. Bare an inch of both wire leads and wrap them around the lugs on the back of the valve in a clockwise direction. Tighten the lugs with a Philips screwdriver. Run your wire in the walls to the valves before you run the pipe.
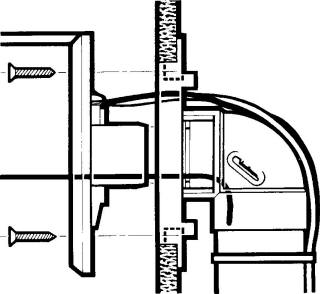
Apply cement to the spigot on the back of the mounting plate and attach a short 90 degree fitting oriented in the appropriate direction. Tilt the mounting plate forward and angle it into the hole in the wall. Center the mounting plate in the hole and pull outward.
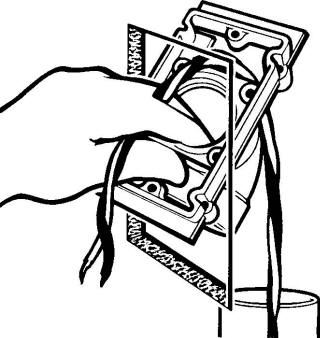
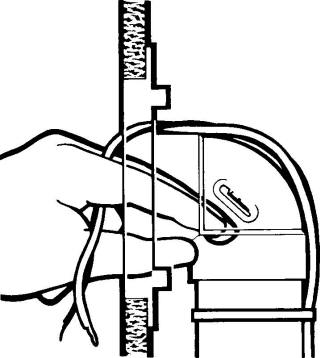
Hold the mounting plate in place with a bent coat hanger. Open the valve lid and slide the valve spigot first over the end of the coat hanger. Keep tension on the coat hanger while inserting the valve into the mounting plate with a twisting motion. Do not use glue; the built-in mounting plate gasket will provide a positive seal. Align the screw holes in the valve with those in the mounting plate. Using the screws provided secure the valve in place. Use the extra short screw if the longer screw is going to interfere with the tubing behind. Do not over tighten.
On the floor below apply glue to an adequate length of tubing and aim it upwards through the hole in the sole plate and into the short 90 degree fitting on the back of the mounting plate. Join this branch line to the trunk line using a sweep tee. Note the airflow direction of the tee. When strapping your wire to the pipe, leave several inches loose at the valve. This facilitates servicing the valve by having slack in the wire.
If the inlet valve is to be serviced from the attic, shorter pieces of tubing joined by couplings may be required due to overhead space restrictions. Precut these pieces and work quickly to prevent the cement on the end of the tubing from drying before it reaches the fitting at the valve below.
Through a Closet
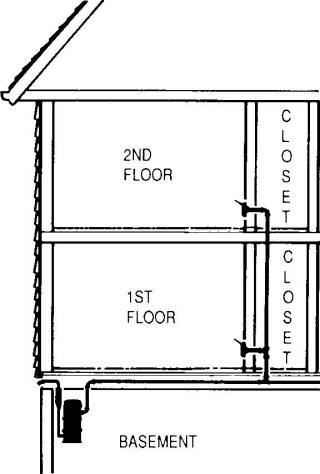
When installing a central vac in existing homes another popular option is to utilize closets in the home. If obstructions make it impossible to run vertical tube lines through partition walls the best and sometimes only option is to go through the insides of closets, particularly when a closet on the second floor is directly above a closet on the main floor. Look for other possibilities as well, such as return air areas or under stairs.

Drill a horizontal pilot hole through the center of a suitable inlet valve location on the wall. Probe for hidden obstructions in the wall with a bent piece of coat hanger. With the pilot hole as a center drill a 2 1/2” hole through both sides of the wall. Using a keyhole saw cut a 2 1/2” x 4 3/8” hole in the outside wall (the side that will have the valve).
Feed the low voltage wire through from the inside of the closet, thread it through the top hole of a trimmed mounting plate and attach it to the lugs on the back of the valve. Instead of a 90-degree fitting that was used in a partition wall, glue a coupling on the spigot of the mounting plate. Attach this assembly to the wall as described above in the partition wall section. Then, from inside the closet, insert a short piece of tubing into the coupling. Dry fit a tight 90-degree fitting pointed in the direction of the trunk line below or above. Cut a 2 1/2” hole below or above the fitting and feed a length of tubing through to the trunk line. When you are satisfied with the fit, permanently glue the fittings in place.
Floor Mounted Central Vac Inlet Valves
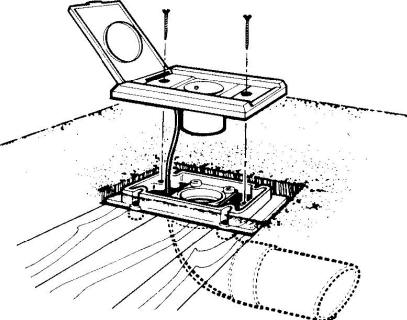
Floor mounted inlet valves are another idea for central vac installation in an existing home. While the normal installation on inlet valves is in partition walls, occasionally one must be installed in the floor. In this case the location for the inlet valve should be about two inches from the wall and not in a high traffic area. As with wall installations use a pilot hole drill to make sure the location is clear of obstructions below. Cut a hole that is 2 1/2’ x 4 3/8’ in the floor. In the case of linoleum or uncovered floors the mounting plate will be installed from below. If the floor is carpeted cut a hole in the carpet with a utility knife and slip the untrimmed mounting plate under the carpet. Fasten the mounting plate to the floor with screws. A coupling and a short piece of tubing may be required as a spacer between the mounting plate and the 90 degree fitting below.

Houses with Slab Floors and Flat Roofs - Central Vac
Houses with flat roofs and slab floors require all inlet valves to be installed in exterior walls and branch lines to be run outside of the house. The tubing system can be run underground or under the eaves of the house. If the power unit is to be mounted outside it must be housed in a weatherproof cabinet that has adequate air vents.
Locate and install the inlet valves in much the same way as for closet installations. Use a tight 90- degree fitting to keep the tubing close to the exterior wall. Seal the edges of the hole in the exterior wall with caulking.

If the tubing system is to run under the eaves pipe straps must support the tubing at least every six feet. On vertical sections carefully wire tie the low voltage wire behind the tubing.
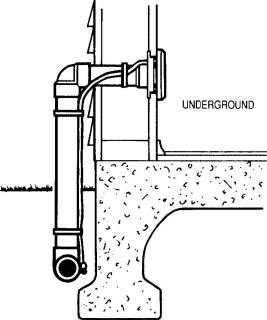
If the tubing is to be buried underground, dig a trench 12 to 18 inches deep along the side of the house. Fully assemble and test the tubing and low voltage wire before filling in the trench. It is recommended that the low voltage wire installed outside be encased in conduit, which is available at most hardware stores. M.D. Manufacturing recommends running the 2- inch pipe and wire within a 3-inch PVC pipe; this relieves condensation buildup with leads to clogs and protects the wire.
Back to the top - Central Vac in Existing Homes
Central Vac Pipe Options (SCH40 vs Industry Standard)
Central Vac Installation - Frequently Asked Questions
Central Vac Installation Standards
Central Vacuum Filtration Types